Saturday, February 14, 2015

Color Your Heart Out

Leah had a little Valentine's Day celebration at her preschool this and all the kids brought Valentines for each of their school friends.  I knew there would be a lot of candy, so we opted for a non-candy version.  We decided to make heart-shaped crayons!

The only supplies you need are a silicone heart mold, white card stock, and LOTS of crayons!  I had a lunch box full of broken and peeled crayons by Leah, so that wasn't an issue for us.
Leah had fun helping me break and peel the crayons.
And we filled each of the molds with the pieces.  I tried to get a rainbow of colors in each one.
Then we placed them in the oven at 400 degrees for 12 minutes and let them cool for at least an hour.  Once they've cooled they pop right out.

I found these adorable free printables here and printed them on white card stock.

Leah got a lot of practice writing her name and signed all the cards!  Here is the final product:

Hope you have a Happy Valentine's Day with your loved ones!

Check out my Valentine's Day wreath and DIY instagram frame from previous years.

Tuesday, February 18, 2014

Insta-frame

Lately I've been on a mission to make use of all the photos I take on my phone and SLR.  It seems that once I upload my pictures, they are lost forever, filed away on my computer, never to be seen again.  So I had an idea to make a frame using all the instagram pictures I've taken since Leah was born.


I dug through our garage and found an old frame that I have been meaning to get rid of because the glass had cracked during the move to our house.


I uploaded a bunch of instagram pictures and ordered them online (Walgreens will print 4x4 square prints for  $0.39 each, same day pick up).


I tied 4 rows of twine onto the frame (if you're using a wooden frame you can also staple to the backside).  Then I laid out my favorite pictures and secured them to the frame with tiny clothespins.


And here is it!  What I love about this frame is that I can easily move pictures around and add new ones as time goes on.


Friday, November 8, 2013

Quick & Easy Fall Wreath

Hope everyone had a fun Halloween!  The Flintstones made their appearance at a couple gatherings this year :)  Costumes (minus the wigs) were made by myself.


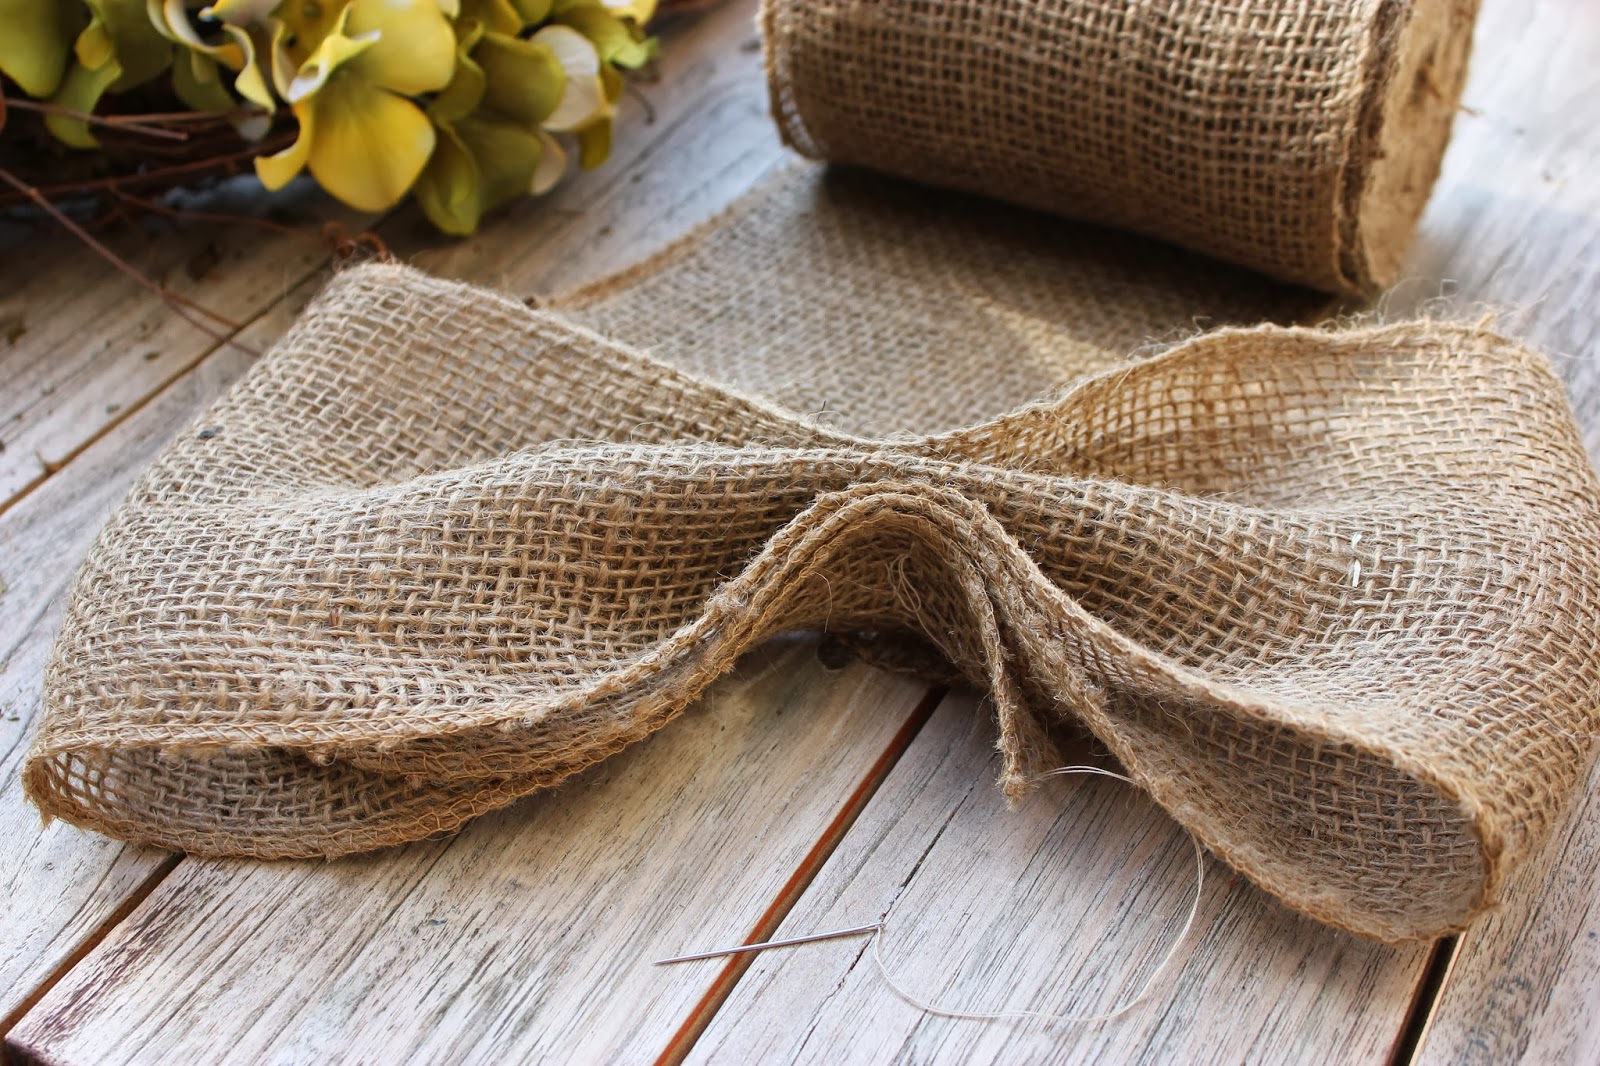
So, now that the Halloween decorations came down, and it's a little too early for Christmas, I wanted to make a fall wreath that I could hang on our front door through Thanksgiving.  I went to Michaels and they were having a sale on everything fall.  I picked up a grapevine wreath, burlap garland, and some hydrangeas.  


I cut most of the stems off the hydrangeas and weaved it through the wreath, bending the wire ends to secure it in place.


I tied a bow using the burlap garland, securing it with a needle and thread to the wreath.


And that's it!  This was one of the easiest wreaths I've made.  


Hopefully Christmas will be just as easy!

Thursday, October 3, 2013

Chalkboard Wedding Festivities


My best friend just got married in wine country last weekend.  She was the most gorgeous bride and her wedding was absolutely perfect.  Don't they look like they're straight out of a wedding magazine? 

Photographer: Marissa from Sweet Poppy Studios

Since she had such fabulous photographers at her wedding, I didn't take any pictures.  Instead, I'll share some pictures from her chalkboard & wine themed shower from a few weeks ago...

Invite via paperless post (such an easy way to manage invitations and RSVPs).

Guests were greeted by a wreath at the door (wine corks hot glued to a foam wreath) with a chalkboard sign in the center.


The signage was made from chalkboard card stock and chalk markers and the sign holders were made from 2 wine corks held together by hot glue and bakers twine.


The bride-to-be sign was also made from chalkboard card stock, chalk markers and twine.


 Guests shared a piece of marriage advice for the soon to be MRS.

 And everyone left with chalkboard stemless wineglasses filled with chocolates.
From my toast...Wishing Mr. Right and Mrs. Always Right a lifetime of love, laughter, wine & sunshine!


Check out more of my chalkboard projects from Leah's 1st b-day here!

Monday, June 24, 2013

Secret Ingredient Zucchini Bread

I had a few zucchini leftover from one of our dinners last week, so I decided to try and make zucchini bread.  I found this recipe online, but I wanted to make it healthier.  I cut out a lot of the sugar, added whole wheat flour and flax, and subbed apple sauce for the oil.  Here is my version:

Makes 1 loaf (12 servings)
Ingredients
1-1/2 cups all-purpose flour 1/2 cup all-purpose flour, 3/4 cup whole wheat flour, 1/4 cup ground flax
1/2 teaspoon salt
1/2 teaspoon baking soda
1/2 teaspoon baking powder
1-1/2 teaspoons ground cinnamon
1-1/2 eggs 2 egg whites
1/2 cup vegetable oil 1/2 cup apple sauce
1 cup and 2 tablespoons white sugar 1/2 cup brown sugar
1-1/2 teaspoons vanilla extract
1 cup grated zucchini 2 cups grated zucchini
2/3 cup chopped walnuts

Directions
  1. Grease and flour 8 x 4 inch bread pan. Preheat oven to 325 degrees F.
  2. Sift flour, flax, salt, baking powder, soda, and cinnamon together in a bowl.
  3. Beat eggs, apple sauce, vanilla, and sugar together in a large bowl. Add sifted ingredients to the creamed mixture, and beat well. Stir in zucchini and nuts until well combined. Pour batter into prepared pan.
  4. Bake for 45 to 50 minutes, or until toothpick inserted in the center comes out clean. Cool in pan on rack for 20 minutes. Remove bread from pan, slice, and enjoy!
The bread was super moist, had a nice crust on top, and was just sweet enough. Leah really liked the bread (another great way to get her to eat vegetables)!  And on a side note, I ran out of apple sauce, so the secret ingredient was a jar of apple cinnamon oatmeal baby food ;)   


Monday, June 17, 2013

Father's Day Recap

I hope everyone had a wonderful Father's Day!  We celebrated by having our parents, siblings and furry friends over for a BBQ yesterday.  Sadly, we were missing my older brother (who was celebrating his first Father's Day), my sister-in-law, and 1 month old nephew who are out on the east coast.  But we toasted to them anyway :)

Leah surprised her Daddy, Poppee and Yei Yei with handprint and footprint mugs she made all by herself.


She also made them personalized cards.  Here is the one she made for Daddy.

And my little brother showed me how to use the timer on my SLR - so we finally have a group shot!  Leah is actually looking at the camera, but too bad the doggies were too busy playing.


Thursday, June 6, 2013

Cheese, Please! Part II

I love cheese.  And if you didn't see my first cheese, please post, I recently received two cookbooks  "Mac & Cheese, Please!" and "Grilled Cheese Please!".  What more could a cheese lover ask for?  After making Zesty Kale Two Ways & Fontina Mac & Cheese I was ready to try out a grilled cheese recipe.  The Havarti with Balsamic-Glazed Carrots sounded interesting as I never thought of putting vegetables in a grilled cheese sandwich. The hubs and I had it for lunch one day and it was delicious!  The carmelized carrots and the creamy havarti melted together to make the perfect, unexpected pairing.

Makes 4 sandwiches
Ingredients
  • 2 tablespoons olive oil
  • 2 large carrots, cut into 4-inch-long segments
  • 2 tablespoons balsamic vinegar
  • Salt and freshly ground black pepper
  • 2 tablespoons butter, room temperature
  • 8 slices rye, whole-grain or Italian bread
  • 8 ounces Havarti

To make the carrots: Heat oil in large nonstick skillet over medium-high heat. Add carrots and cook, stirring frequently, until caramelized around the edges, 5 to 7 minutes. Turn heat to medium-low and add vinegar and salt and pepper to taste. Cover and cook until soft, about 5 minutes. Transfer to a plate.

To assemble: Butter one side of each slice of bread. Place 4 slices on your work surface, buttered side down. Place carrots on bread. Distribute cheese over carrots. Top with remaining bread slices, buttered side up.
Heat a large nonstick skillet over medium heat for 2 minutes. Put sandwiches into pan, cover and cook for 3 to 4 minutes, until golden brown. Flip sandwiches, pressing each one lightly with the spatula to flatten slightly. Cover and cook 3 to 4 minutes, until golden brown. Turn 1 more time, and cook for about 1 minute, or until cheese has melted completely. Remove from pan and cool for 5 minutes. Cut in half and serve.

I served the grilled cheese sandwich with a side of mixed greens dressed with olive oil, lemon juice, salt and pepper.
Yum!